What is a jaw bone biopsy?
When you use the term “bone biopsy,” this could mean you are taking a piece of bone or you are taking tissue that resides inside a bone.
There are two approaches for a bone biopsy. A closed/needle bone biopsy involves inserting a needle through the skin/mucosa directly into the bone, and an open bone biopsy requires making an incision to expose an area of the bone.
In the jaws, the use of a large core bone biopsy needle to get a bone sample is not required because the jaw bone is covered with only mucosa in most areas and you can easily access the bone via a mucogingival flap procedure.
Once the bone is exposed you can then remove a piece of bone for analysis or drill or curette the overlying bone to get at the cyst lining or tumor tissue in cases where there is a mass or lesion inside the bone.
Like what you’re learning? Download a brochure for our Orofacial Pain and Oral Medicine certificate or master’s degree program.
Indications
- Any radiolucent bone lesion (usually periapical lucency) that fails to respond to root canal treatment
- Any intraosseous lesion that appears unrelated to the tooth
- Inflammatory changes of unknown cause that persists for long periods
- Radiolucent or radio-opaque osseous lesions that are expanding in size, displacing normal anatomy (expanding the bone or displacing or eroding the teeth)
Related Reading: How to Perform an Incisional Oral Biopsy
Contraindications & Adverse Reactions
- Removing a cyst or mass in the mandible may result in inferior alveolar nerve damage.
- Removing a cyst or mass from the palate may result in palatal–nasal fistula.
- Removing a cyst or mass from the posterior maxilla may result in a maxillary sinus fistula.
- Deferral of biopsy is indicated in a patient with serious medical problems until it is resolved.
Potential Complications
- Bruising and discomfort
- Bone fracture
- Bone infection (osteomyelitis)
- Damage to surrounding tissue
- Excessive bleeding*
- Infection near the biopsy areas
*Note: Some people with bone disorders also have blood clotting disorders, which can increase the risk for bleeding
Related Reading: How to Perform an Oral Cavity Punch Biopsy
Hard Tissue Biopsy Planning
Prior to the procedure, you must have an idea of how, where and what kind of procedure you are going to perform.
1. Identify the Biopsy Site
For intraosseous lesions, the goal is to examine and sample the content of the lesion and/or the lining. If the lesion is expanding and creating thin areas on the bone, biopsy should be approached from that area. If the lesion is not creating any thin areas, biopsy should be approached near the center of lesion (radiographically).
For an exposed bone lesion (e.g. bone necrosis), the goal is to sample an abnormal bone segment.
2. Prepare Your Instruments
The basic instruments you need for a hard tissue biopsy include:
- Local anesthetic cartridge and syringe
- Scalpel: Blade handle with the disposable blade or a disposable scalpel
- In the mouth, the #15 and #12 blades are most commonly used
- Tissue forceps without teeth
- Retractor
- Periosteal elevator
- Spoon excavator
- Round bur for low-speed contra-angle handpiece
- Bone file
- Bone rongeur
- Needle holder and suture: 4-0 silk sutures are commonly used
- Scissors
- Gauze
- Curved forceps, and bite block (as needed)
- Specimen bottle with fixing solution and biopsy data sheet
- Normal saline and syringe to cool the bur and bone during the procedure
3. Administer Anesthesia
In general, patients are afraid and nervous for any surgical procedures. The more pain control you achieve, the more likely the procedure will be successful.
Use both topical and local anesthesia in attempt to obtain less or no pain to the patient during the procedure. For intraosseous lesions, anesthesia blocks are recommended.
During local anesthesia infiltration, evaluate the bone thickness using the anesthesia needle. This will provide more precise information than palpation using your finger.
If there are areas where the bone is expanded and thin, you may want to perform a needle aspiration prior to the procedure using a 20-22G needle (unless you have already performed it and achieved the lesion content at a different appointment). This will provide information of the lesion: if it is a vascular lesion or not, the consistency of the lesion (liquid, solid tumor, empty cavity).
Note: Do not rush to the next step. Take enough time for the local anesthesia to work.
Related Reading: The Dentist’s Guide to Oral Pathology of Vesicular Ulcerative Conditions
Don’t have time to read The Dentist’s Guide to Oral Pathology of Vesicular Ulcerative Conditions? Download the checklist!
Jaw Bone Biopsy Procedure
1. Choose the Appropriate Mucogingival Flap
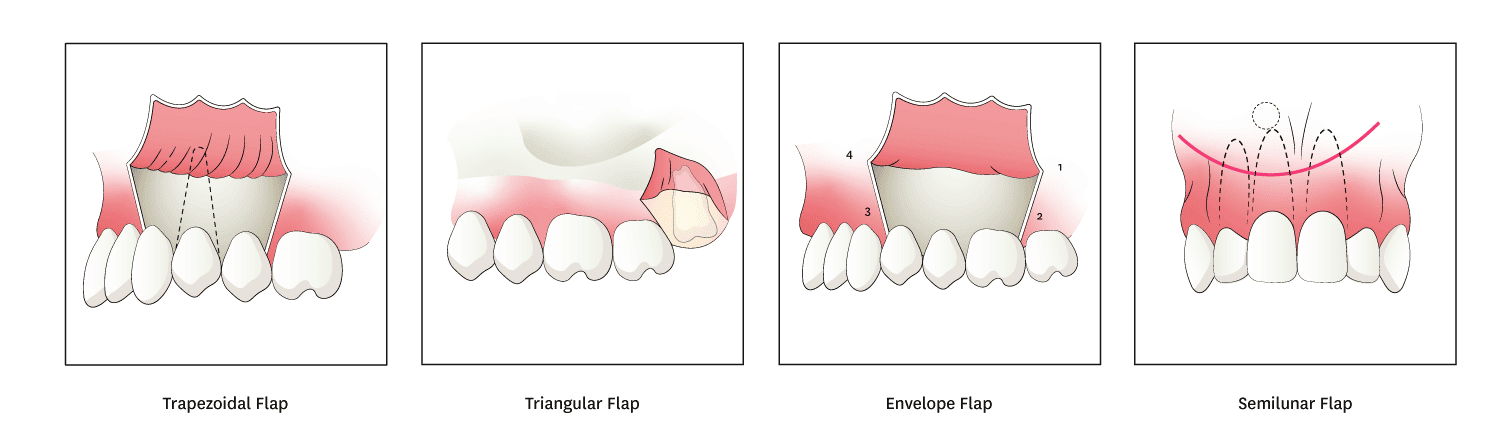
Mucoperiosteal flap should be designed to allow adequate access for the biopsy. The common flaps used for osseous lesions include trapezoidal flaps, triangular flap, envelope flaps, and semilunar flaps.
A. Trapezoidal Flap
A horizontal incision along the gingival sulcus with two oblique vertical releasing incisions extending to the buccal vestibule. This type of flap is used in large surgical procedures, providing adequate access.
B. Triangular Flap
A horizontal incision along the gingival sulcus with one oblique or vertical incision resulting in an L-shaped incision. This type of flap is used in small lesions or for incisional biopsies for a large lesion which is extending to areas where suturing will be difficult if the posterior vertical incision is created.
C. Envelope Flap
An extended horizontal incision along the cervical sulcus of the teeth. The length usually involves 3-4 teeth, but it should be long enough to provide adequate access to the area of interest without the need for excessive retraction.
D. Semilunar Flap
A curved incision which begins just above the vestibular fold and has a bow-shaped course with the convex part towards the attached gingiva. The lowest point must be at least 0.5cm from the gingival margin so the blood supply is not compromised. Each end of the incision must extend at least one tooth over each side of the area of bone removal. This type of flap is used for apicoectomy and small cyst removal near the root of the tooth.
Incisions should be over sound bone and not over a bony defect or over vital structures (e.g. mental foramen, lingual nerve). Firm continuous should be performed. Keeping a finger rest on a nearby tooth while you incise into the mucosa will allow you to incise through the periosteum.
Vertical incisions should always extend from the interdental papilla (mesial or distal line angle of the tooth) and never from the center of the tooth, and should not extend to the mucobuccal fold. This intact papilla serves as an anchoring point for sutures and has the least wound contraction on closure. Horizontal incisions should extend at least 1-2 teeth on either side of bone removal, and the base of the flap must be at least equal (or wider) than the reflected free margin to ensure proper blood supply to the reflected soft tissue.
2. Reflect the Flap
Once you create an incision, insert the periosteal elevator in between the bone and flap. Flaps should be full thickness which involves the periosteum in order to maintain the blood supply to the flap.
Next, reflect the flap with gentle to moderate force. Passing the mucogingival fold with the elevator will allow full reflection of flap. Once the flap is reflected, frequently irrigate with sterile saline to keep the tissue moistened, to reduce contamination and to improve visibility.
Note: Work from mesial to distal to avoid unnecessary trauma to the adjacent tissue.
3. Remove the Bone (Window Formation)
Alveolar bone removal must be as conservative as possible; only remove the amount to achieve access that is needed. A rotary bur with low-speed handpiece should be used to open into the lesion. Continuous irrigation with sterile saline must be performed during this procedure to decrease the amount of trauma to the bone due to the heat. If the bone is already thin, you may use a spoon excavator or bone rongeur to open the window for access. Try not to perforate into the lesion while removing the over lining bone.
4. Remove the Specimen
Osseous windows should be submitted for pathology. Sometimes the cystic wall may be extremely thin and attached to the bone, and you cannot clearly visualize it.
The tissue consistency and nature of the lesion will determine the ease of removal and treatment option. With both the pre-operative differential diagnoses and exact objective findings, you may change your treatment plan (incisional vs excisional) during the procedure.
Like what you’re learning? Download a brochure for our Orofacial Pain and Oral Medicine certificate or master’s degree program.
5. Transfer the Bone and Tissue Specimen Into the Fixing Solution
Use one bottle per specimen. Do not mix specimens unless it is a connective tissue mass that came out in several parts. Submit the osseous window together with the lesion content.
- The volume of formalin should be at least 20 times the volume of the specimen.
- Each container should be identified with the patient’s name, clinician’s name, date and the site of the biopsy.
- Put the sample immediately into the transport media, not on gauze or on the surgical tray where the tissue may dry out or undergo significant autolysis, and make sure the cap is tight so it does not spill during transportation.
- Fill out the biopsy data sheet.
Provide the pathologist with clinical information and background which includes clinical appearance, duration, symptoms, pertinent medical history, risk factors, and clinical differential diagnosis.
Submit copies of clinical/radiographic images with the biopsy if possible to give the pathologist the ability to correlate clinical, radiographic and histopathologic findings, but do not draw on or circle the lesion on photographs or radiographs – the pathologist will be able to see the abnormality without you pointing it out and possibly distorting the image.
6. Clean the Operative Field
Once you obtain the specimen or remove the entire lesion, irrigate the operative site thoroughly with sterile saline. Osseous windows should be evaluated with fingers and any sharp edges must be smoothened with the bone file, and the area should be irrigated after using the bone file.
7. Close the Wound
Soft tissue overlying the lesion should be re-approximated. If you placed a vertical incision, flap closure should begin from the corner of flap. The flap should not be tightly closed as this will decrease the post-operative swelling and pain. In selected cases, the wound will not be completely closed (e.g. drain placement, marsupialization technique).
Post-operative Care Instructions
Pain
Prescribe NSAIDs or stronger analgesics (e.g. Vicodin) for hard tissue biopsies, especially when you removed the bone. Patient may also apply ice-packs when the pain is extreme. For any biopsies, it is advisable to instruct the patient to take one tablet of analgesic before the anesthesia wears-off. If you do not hold any analgesics in your office, you should advise the patient to bring in the medication which they usually take when they have pain at the day of biopsy.
Antibiotics
Depending on the extent of the procedure, antibiotics should be prescribed. Antibiotics should be determined by the spectrum of the medication and patient’s allergy history.
Bleeding
Bleeding can occur for a couple of days after the procedure. Instruct the patient to apply direct pressure for 15 minutes using a gauze or tissue to stop bleeding. If it continues to bleed, instruct patient to contact the clinic.
Swelling and Bruising
Swelling will happen as part of the healing process. Educate the patient that peak of swelling is generally 3 to 4 days after the procedure and then it will gradually subside. As the swelling reduces, patient will notice the bruise on the face. Educate the patient that this might have color changes (anywhere from red, purplish-blue, green, brownish-yellow and yellow) and can extend to the neck.
Keep in mind that if you submitted a bone sample, the pathologist generally takes more time to evaluate the specimen. You should inform this to the patient. Lastly, for smokers, educate them to stop smoking during the period where tissue is healing. Especially, smoking habits can complicate healing (e.g. osteitis).
Earn an Online Postgraduate Degree in Orofacial Pain and Oral Medicine
Are you interested in a variety of issues focused on orofacial pain, medicine and sleep disorders? Consider enrolling in the Herman Ostrow School of Dentistry of USC’s online, competency-based certificate or master’s program in Orofacial Pain and Oral Medicine.